Last month we tracked for one week what we ate and spent on food. If you did it, were you surprised by the end result? Did you spend and eat more or less than you expected?
If you missed last month’s goal, just pick up where you are. Track what your family eats and what food you buy with the attached menu plan for a few days. Doing this will help you know better how much food and what type of food you will need for your one-month supply.
This month we want you to take the attached menu plan and make a 1-week menu plan of foods your family likes that will keep well for a while. It’s up to you to decide if that means shelf-stable, freezer-safe, or lasts-a-long-time-in-the-fridge. To save money, take a long look at your pantry. Think about what you could make into meals with what you already have. I like to take an ingredient or two and type it into an online recipe site like allrecipes.com or myrecipes.com and see what what recipes come up.
As we are working on our 1-3 month food storage, we’ve realized we need to get creative on some major food items because we can’t necessarily store a month’s supply—things like milk, bread, cheese, yogurt, and fresh produce. Everyone will have their own solutions and dilemmas as they work on this, but here’s some ideas we’ve discovered that might help:
MILK. Keep a pitcher full of dry milk all mixed up and ready to go in the fridge to use for anything where the taste of the milk doesn’t matter—in baked goods, pancakes, sauces, pudding, etc. You could also keep a gallon or two of milk in your freezer if you have space (it takes several days to defrost, but it tastes fine).
CHEESE. There are shelf-stable cheeses out there (Velveeta, Laughing Cow, etc.) and I learned recently how to can cheddar and mozzarella cheese in jars (let me know if you’re interested, and I can help you do it—it’s really easy!). Some cheeses will keep well in the fridge for a long time, or can be grated and frozen for even longer.
BREAD. Keeping enough bread in your freezer for 1-3 months could take up a lot of space. Why not make your own? Store-bought bread pales in comparison to the homemade stuff! Another added bonus: it doesn’t seem so much like a cop-out to open a can of soup, add fresh-baked bread, and call it dinner. We sometimes have fresh bread and hunks of cheese for dinner with a simple green salad. This can be a huge money-saver if your family buys into it! Think baking bread is something you will never do? Try it. You might be surprised it will taste, even if it doesn't turn out looking pretty!
YOGURT. Did you know you can make yogurt from dry milk? We have a little machine that does it, but basically you just take some milk, add a little yogurt with live cultures, keep it warm for about 6 hours, and you’ve got yogurt. From the yogurt you can make yogurt cheese and all sorts of great baked goods, dips and sauces.
FRESH PRODUCE. Some vegetables and fruits stay fresh a lot longer than others. Root vegetables like carrots, potatoes, garlic and onions can keep for months. Winter squashes, apples and oranges will also last long in a cool place. Or why not try growing your own produce? This is a perfect time to prepare the soil for your spring garden and start planning it out. You can get details about the right time to plant things on your local county extension service website. Our our county's website we can get recommendations for plant varieties and fall planting times.
Once you get a one-week menu plan that you’re happy with, make a shopping list and go shopping. Congratulations! You will then be 25% finished with the goal of 1-month food storage by June 30th.
Showing posts with label yogurt. Show all posts
Showing posts with label yogurt. Show all posts
Monday, February 09, 2009

Friday, January 09, 2009
Use Your Powdered Milk to Make Yogurt!
I got myself a little after-Christmas present: a yogurt-maker!
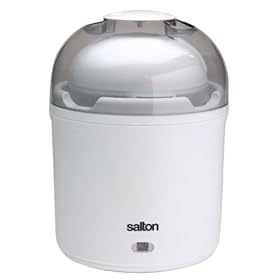 I used 4 cups of water and 1 cup of powdered milk, plus 1/2 cup of yogurt starter (plain yogurt with active cultures). I stuck it in the little machine and it kept it warm all night. Woke up to a quart of perfect plain yogurt. That very day, I was so excited that I made strawberry-flavored yogurt, veggie dip, yogurt chicken, and tried to make a drinkable strawberry yogurt for the kids (most of them wouldn't even try it--ingrates!).
It's actually kind of a silly appliance for the price (I paid $15.30 on Amazon, but now it's up to $23.30!). But you don't need a fancy, or even a simple machine to make yogurt. There are other ways to keep it warm. I remember a really cool middle-aged teacher guy I would chat with in the teacher's lounge in DC when I was student teaching who told me in excruciating detail about how to make yogurt by putting your concoction on top of the fridge for a few days. Apparently, all you need is a temperature where the "good" bacteria will multiply and turn the rest of the milk into yogurt. And everything needs to be really clean so you don't introduce "bad" bacteria into the mix. Here's some instructions for doing it in your oven (got these from a reviewer on amazon.com):
"Get a quart-size carton of milk and some yogurt, both at room temperature. Open the milk carton, pour some out to make room in the carton, and add 1/2 c. of plain yogurt with live cultures (like Stonyfield Farms or Dannon plain yogurt). Close up the carton again, clip shut, and shake it gently to mix up the milk and yogurt. As for the milk you poured out (you saved it right?), that's going to be your starter for the next batch, so add a couple teaspoons of yogurt to that, give it a good stir, and cover tightly. Get an old (but clean!) bath towel and wrap both in it. Place on a cookie sheet and place in 110 degree F oven. "Bake" at 110 degrees overnight - around 12 hours - remove from oven and refrigerate. Perfect European-style yogurt! (For the thicker American style, add powdered milk along with your yogurt "starter.") Best of all, there's no need to pre-heat/scald the milk (not necessary if you use pasteurized milk) and no cleaning (since you make the yogurt right in the paper milk carton straight from the store). Any size milk carton will work -- just adjust the amount of starter accordingly."
Here's some of my yogurt recipes:
Gracie's Dill Dip
Gracie is our two-year-old cousin who lived with us in India. Her mom adapted her usual veggie dip to use yogurt instead of sour cream, since we couldn't get sour cream there. Gracie didn't notice the difference and ate it nearly every day with carrots and cucumbers, and she's a pretty discerning child! Dawn may have to correct me a little, but here's my best guess:
2 c. yogurt (or any combination of yogurt, mayo, and/or sour cream)
1/2 t. dried dill weed (or 1/2 T. fresh dill)
1/2-1 t. seasoned salt
1/4 t. dried onion
Mix together. Keep in fridge and serve with carrots, cucumbers, celery, on crackers, on fish, etc.
Drinkable Yogurt
If someone can help me figure out how to put this in those Danimals containers and seal it up so I can toss it in my kids' lunchboxes, I'll be your best friend!
2 c. yogurt
1/4 c. sugar (more or less to taste)
1 T. fruit syrup or jam
1/2 c. milk
Yogurt Chicken Nuggets
Found this on the back of the Stonyfield Farms yogurt--a healthy alternative to chicken nuggets or fried chicken.
4 boneless, skinless chicken breasts (about 2 lbs., cut in pieces if you like)
2 c. plain yogurt
Salt and pepper to taste
Garlic and/or onion powder to taste (optional)
2 c. cornflake crumbs, or panko (Japanese bread crumbs)
Preheat oven to 350. Season yogurt liberally with seasonings. Put cornflake crumbs or panko in a shallow bowl. Place chicken breasts or pieces in the yogurt, coat well, then remove. Wipe excess yogurt from chicken and roll in the cornflakes/panko. Bake for 30 minutes or more, until browned and the juices run clear. Serves 4.
Raitha
A yummy relish that tastes great with any Indian food (cools the heat!) or mixed with rice.
2 c. plain yogurt
1/2 cucumber, peeled and grated
1/4 onion, grated
1/2-1 t. salt
1/2-1 t. cumin powder (can roast it in a pan beforehand to enhance the flavor)
Squeeze the liquid out of the grated vegetables. Mix it up and serve it with an Indian meal, or even a Greek meal. It will keep well in the fridge for a week or more.
Cinnamon Surprise Cake
This was a Family Fun recipe that we altered in India due to the lack of sour cream. The results are delicious! The yogurt gives it a slightly tart flavor and makes the cake so very moist. I would often make it Saturday night, have it for breakfast with a fruit smoothie, and then for dessert after Sunday dinner (or a snack while we tried to pull dinner together!). Try adding raspberries and/or chopped pecans for a special treat.
Filling:
1 T. cinnamon
1-2 T. softened butter
1/3 c. brown sugar
2 T. flour
Cake:
3 c. flour
2 t. baking powder
1/2 t. baking soda
1/2 t. salt
1/2 c. butter (room temp)
1 1/2 c. sugar
3 eggs
2 t. vanilla
2 c. plain yogurt
powdered sugar (for dusting)
Heat the oven to 350° and grease a 12-cup bundt pan (or two 9- by 5-inch loaf pans, or two 6-cup bundt pans). To make the cinnamon filling, place the cinnamon, butter, brown sugar, and flour in a small bowl and mix with your fingers. Set aside.
For the coffee cake, combine the flour, baking powder, baking soda, and salt in a large mixing bowl. In a separate large bowl, cream the butter and sugar, then beat in the eggs, one at a time. Beat in the vanilla extract and the sour cream. Gradually add the dry ingredients, beating well after each addition.
Spoon half of the coffee cake batter into the large bundt pan (or, if you're using two smaller pans, one quarter of it into each pan). Crumble the cinnamon mixture over the top. Pour in the remaining batter and then use a table knife to swirl the cinnamon throughout. Bake for about 60 minutes (or 40 minutes for the smaller loaves) or until a toothpick inserted in the cake comes out clean.
Invert the coffee cake onto a rack and cool it thoroughly before dusting with powdered sugar. Serves 10 to 12.
I used 4 cups of water and 1 cup of powdered milk, plus 1/2 cup of yogurt starter (plain yogurt with active cultures). I stuck it in the little machine and it kept it warm all night. Woke up to a quart of perfect plain yogurt. That very day, I was so excited that I made strawberry-flavored yogurt, veggie dip, yogurt chicken, and tried to make a drinkable strawberry yogurt for the kids (most of them wouldn't even try it--ingrates!).It's actually kind of a silly appliance for the price (I paid $15.30 on Amazon, but now it's up to $23.30!). But you don't need a fancy, or even a simple machine to make yogurt. There are other ways to keep it warm. I remember a really cool middle-aged teacher guy I would chat with in the teacher's lounge in DC when I was student teaching who told me in excruciating detail about how to make yogurt by putting your concoction on top of the fridge for a few days. Apparently, all you need is a temperature where the "good" bacteria will multiply and turn the rest of the milk into yogurt. And everything needs to be really clean so you don't introduce "bad" bacteria into the mix. Here's some instructions for doing it in your oven (got these from a reviewer on amazon.com):
"Get a quart-size carton of milk and some yogurt, both at room temperature. Open the milk carton, pour some out to make room in the carton, and add 1/2 c. of plain yogurt with live cultures (like Stonyfield Farms or Dannon plain yogurt). Close up the carton again, clip shut, and shake it gently to mix up the milk and yogurt. As for the milk you poured out (you saved it right?), that's going to be your starter for the next batch, so add a couple teaspoons of yogurt to that, give it a good stir, and cover tightly. Get an old (but clean!) bath towel and wrap both in it. Place on a cookie sheet and place in 110 degree F oven. "Bake" at 110 degrees overnight - around 12 hours - remove from oven and refrigerate. Perfect European-style yogurt! (For the thicker American style, add powdered milk along with your yogurt "starter.") Best of all, there's no need to pre-heat/scald the milk (not necessary if you use pasteurized milk) and no cleaning (since you make the yogurt right in the paper milk carton straight from the store). Any size milk carton will work -- just adjust the amount of starter accordingly."
Here's some of my yogurt recipes:
Gracie's Dill Dip
Gracie is our two-year-old cousin who lived with us in India. Her mom adapted her usual veggie dip to use yogurt instead of sour cream, since we couldn't get sour cream there. Gracie didn't notice the difference and ate it nearly every day with carrots and cucumbers, and she's a pretty discerning child! Dawn may have to correct me a little, but here's my best guess:
2 c. yogurt (or any combination of yogurt, mayo, and/or sour cream)
1/2 t. dried dill weed (or 1/2 T. fresh dill)
1/2-1 t. seasoned salt
1/4 t. dried onion
Mix together. Keep in fridge and serve with carrots, cucumbers, celery, on crackers, on fish, etc.
Drinkable Yogurt
If someone can help me figure out how to put this in those Danimals containers and seal it up so I can toss it in my kids' lunchboxes, I'll be your best friend!
2 c. yogurt
1/4 c. sugar (more or less to taste)
1 T. fruit syrup or jam
1/2 c. milk
Yogurt Chicken Nuggets
Found this on the back of the Stonyfield Farms yogurt--a healthy alternative to chicken nuggets or fried chicken.
4 boneless, skinless chicken breasts (about 2 lbs., cut in pieces if you like)
2 c. plain yogurt
Salt and pepper to taste
Garlic and/or onion powder to taste (optional)
2 c. cornflake crumbs, or panko (Japanese bread crumbs)
Preheat oven to 350. Season yogurt liberally with seasonings. Put cornflake crumbs or panko in a shallow bowl. Place chicken breasts or pieces in the yogurt, coat well, then remove. Wipe excess yogurt from chicken and roll in the cornflakes/panko. Bake for 30 minutes or more, until browned and the juices run clear. Serves 4.
Raitha
A yummy relish that tastes great with any Indian food (cools the heat!) or mixed with rice.
2 c. plain yogurt
1/2 cucumber, peeled and grated
1/4 onion, grated
1/2-1 t. salt
1/2-1 t. cumin powder (can roast it in a pan beforehand to enhance the flavor)
Squeeze the liquid out of the grated vegetables. Mix it up and serve it with an Indian meal, or even a Greek meal. It will keep well in the fridge for a week or more.
Cinnamon Surprise Cake
This was a Family Fun recipe that we altered in India due to the lack of sour cream. The results are delicious! The yogurt gives it a slightly tart flavor and makes the cake so very moist. I would often make it Saturday night, have it for breakfast with a fruit smoothie, and then for dessert after Sunday dinner (or a snack while we tried to pull dinner together!). Try adding raspberries and/or chopped pecans for a special treat.
Filling:
1 T. cinnamon
1-2 T. softened butter
1/3 c. brown sugar
2 T. flour
Cake:
3 c. flour
2 t. baking powder
1/2 t. baking soda
1/2 t. salt
1/2 c. butter (room temp)
1 1/2 c. sugar
3 eggs
2 t. vanilla
2 c. plain yogurt
powdered sugar (for dusting)
Heat the oven to 350° and grease a 12-cup bundt pan (or two 9- by 5-inch loaf pans, or two 6-cup bundt pans). To make the cinnamon filling, place the cinnamon, butter, brown sugar, and flour in a small bowl and mix with your fingers. Set aside.
For the coffee cake, combine the flour, baking powder, baking soda, and salt in a large mixing bowl. In a separate large bowl, cream the butter and sugar, then beat in the eggs, one at a time. Beat in the vanilla extract and the sour cream. Gradually add the dry ingredients, beating well after each addition.
Spoon half of the coffee cake batter into the large bundt pan (or, if you're using two smaller pans, one quarter of it into each pan). Crumble the cinnamon mixture over the top. Pour in the remaining batter and then use a table knife to swirl the cinnamon throughout. Bake for about 60 minutes (or 40 minutes for the smaller loaves) or until a toothpick inserted in the cake comes out clean.
Invert the coffee cake onto a rack and cool it thoroughly before dusting with powdered sugar. Serves 10 to 12.
Subscribe to:
Posts (Atom)
